Tuesday, November 8, 2011

Gift Giving

When making homemade gifts it is important to think about the recipient more than anything – which is true for all gift giving! Many years ago I began reducing our purchased Christmas gifts, so most of the gifts are homemade now. Some of my homemade gifts didn’t go over so well and some were huge hits! But isn’t that true of purchased gifts too? How many times did you purchase that “OMG I gotta have that $30 doll!” for it to only be played with twice?

Christmas, Hanukah, Kwanza, Birthdays, etc. does not have to, and should not, break the bank! I realize kids want the latest and greatest $80 video game or that new cell phone that’s $200. But do they NEED it? I feel we are not teaching our kids the difference between a want and need, and what it takes to fulfill either! At the same time parents tend to feel guilty as if they are depriving their children if they do not get them “the latest and greatest”. IF that is the case and it really gnaws at you, purchase only one or two high dollar gifts and supplement the rest.


Many people ask for ideas on what they could make and or at least not spend a ton of money and here is a small list of ideas:


*A travel game made from felt, one side checkers and the other tic-tac-toe. (can be for boy or girl) This is a no sew project, just use the “wonderunder” or “stitchwithcery” stuff, all you need is an iron.

*A poncho made from a fleece blanket (more girly ;) )

*Sew pj bottoms, either pants or shorts (boy or girl – can even use a fleece blanket too!)

*Make a book for the “String Game” you can find many of the directions to make the different shapes and print them out (remember “cats cradle?”)

*crochet or knit scarves, face warmers, gloves, socks

*Make up a board game (small wooden pieces can be purchased at a craft store for very little)

*crochet, knit or sew an mp3/Ipod/Cell Phone cover

*sew up some dress up clothes and props, one year made daughter a “fairy” skirt, headband with ribbon and tissue paper flowers, and “fairy” wings made with two hangers with the hook duct taped together and the “arms” of the hanger were the wings. I covered it all in cheesecloth, ribbons, and more silk and tissue paper flowers and used elastic to put around the shoulders.

*for all my kids (have two and two others who were not really mine but in my heart they are) made a binder with their favorite recipes in it and old family recipes with who they were from – and if they were handwritten I photocopied them along with any time we had “special” recipes or traditions (is: cabbage rolls with a foil wrapped dime in one roll for New Years with Black Eyed Peas etc and why we had them) Now every year I send them new recipes I think they may like to add to their book. This is a wonderful example of what you can do http://crafted-love.blogspot.com/2011/03/spring-cleaning-recipe-journal.html

*Sew a bucket buddy from fun material or made from old jeans for tougher users. This is great for those adults who have tools – and don’t just think of it as just for the guys with hammers etc, does anyone in your family go to Bingo Halls? I am sure they would love to have a bucket buddy for their daubers! Or your crafter in the family, a bucket buddy works wonders for being able to craft on the go! BTW a coffee can makes a great "bucket" :)

*macramé plant hangers (all it is is tying knots!!!) Maybe start rooting some cuttings now to put into pots for the plant hangers!

*crocheted sponges (work GREAT)

*Sew lap quilts from the kids old clothes for the grandparents (“rag” lap quilts can be done in a day)

*sew “doorags” (my crews favorite) or scarf coolers. The polymer beads you can purchase online; here is just one source http://www.watersorb.com./

*sew/knit/crochet up some doll clothes or furniture

*Make a “Fort Kit”. You can get all kinds of ideas from the net on different “forts”. Or you can go simply with a sheet and clothes-pins!


Stocking Stuffers:
*brushes / combs / hair ties / toothbrushes
*special shampoos / soaps (even homemade!)
*the mp3/Ipod?Cell Phone cover!
*fruits or granola bars to tide the kids over till breakfast is ready
*coupon books (ie: extra hour of video game, or skip a chore, etc)
*small games. Do you remember Jacks? How about “Chinese Jacks”?  If you have a Gibsons, they carry the small plastic rings used to make them – if not then use colored paper clips! Google it. (a little secret – I still love to play with both!)


There are so many ideas out there and we have such a useful tool now to get the ideas, the internet! Just use your imagination and go "shopping" for ideas on the net, believe me you will find all kinds of nifty suggestions!

Do you have any other suggestions?

Saturday, November 5, 2011

Tree Differences

These trees, if I remember right, are "Chinese Potash" trees. They were the same age, same height, acquired from the same location and put into the ground at the same time.


If you look to the left of the pic above you will see a 6ft T-post in the ground, to give you an idea of what the scale is. BTW I love the color on this one! So fall like! Now look at the pic below. If you look on the ground to the left you will see a camp picnic table, the white is the top of the table and the blue is the seats.


Incredible difference isn't it! What we did differently? Compost tea. WOW. Its amazing what compost can do :)

Wednesday, November 2, 2011

Spiders!

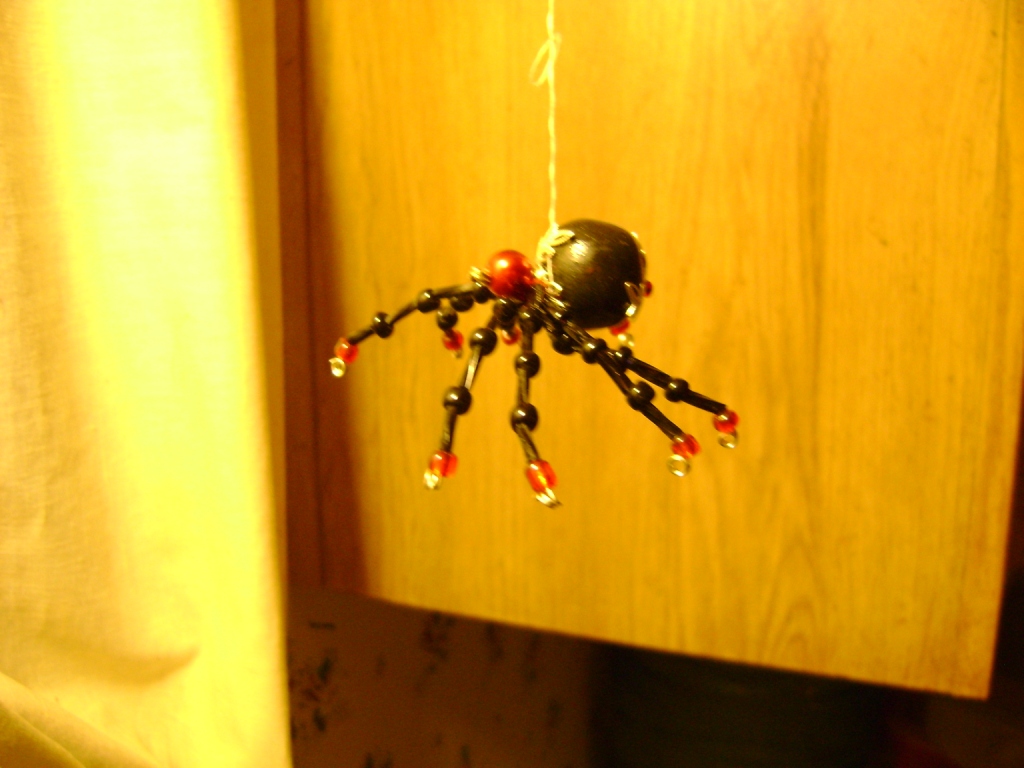
My son's girlfriend "Blue-eyes" made these beautiful spiders that I absolutely fell in love with, and bless her heart, she let me take home 3 spiders AND a scorpion! I have no clue how she did it, though I am sure directions are somewhere on the internet :D

I just wish I could take pictures to do them justice. I have no idea why they keep getting so blurry but these were the best pics from a seriously bad lot! I got some better pics... it was the camera, not the operator... I think my hubby lost a camera....   :D


But the smaller pink one I am putting on my hat like so:


I bet I am the best dressed out there hangin' up that laundry!

THANK YOU "BLUE-EYES"!!!!

Tuesday, November 1, 2011

Crocheted "Sponges"

Here are my crocheted "sponges" or Dish-clothes... Basically if I like a stitch, I just do a small square of it and go from there, or if it needs a little more oomph to it, I do a rectangle and then fold in half, stitch or slip stitch the edges closed (or leave one end open to put hand inside) and viola, your done!


The green one I just did the other day (told you my favorite color was pink!). And these little suckers will SCRUB! Without scratching - woot! Now if you clean off a counter or something you will need to follow with a towel to get up the excess water: that is an issue I have been mulling over. I may try to make one side the crocheted side and the other maybe from the washcloths or towels that have holes in them..... hmmmm.

Monday, October 31, 2011

Onion Bag

Yesterday was bored and doing anything possible to avoid housework. Well I made me another crocheted sponge, but it went so fast that I needed another quick project. (I don't like the long drawn out making an afghan type projects!). I realized I had onions in two separate baskets - you know those metal 3 tiered hanging ones? We use a lot of onions. So I decided to make an Onion Bag and wrote down the directions as I made it. I was trying to figure all day where in the house I could take a picture of it where it wouldn't show how much I should quit avoiding housework, when it occurred to me... "take a picture outside"!!! (duh!) Of course it is dark now, so will take one tomorrow :)


Abbreviations
Ch - chain
Slst - slip-stitch
Cts - counts
Dc - Double Crochet
Sc - Single Crochet
*blah blah* - follow those directions for row

Net Base
Start:   Ch 4. slst in 1st ch. Ring formed
Row 1:   Ch3 (cts as first dc) 11dc in ring (total 12 dc). Slst in top of ch3. turn.
Row 2:   Ch8 (cts as 1sc and ch7) *sk dc. Sc in next dc. Ch7* around. Slst in base of ch8. 6 loops. Turn.
Row 3:   Ch8 (cts as 1sc and ch7) *sc in top of next loop. Ch7. sc in sc. Ch7* around. Slst in base of ch8. 12 loops. Turn
Row 4:   slst in next 4 chains. (until you are at the top of ch7 loop). Ch7 (cts as 1st sc and ch6). *sc in next loop. Ch6.* around. Slst in base of ch7. 12 loops. Turn.

Net sides
Rows 5-20:   repeat row 4. 12 loops
Row 21:   ch1. * 6sc in next loop. Sc in sc.* around. Join with slip stitch to beg ch st. turn

Handle
Row 1:   ch3 (cts as beg dc). dc in next 6 sc. Turn (total 7dc)
Row 2:   ch3 (cts as beg dc). Dc in next 6dc. Turn (total 7dc)
***continue Row 2 until handle is length you want*** (mine I did 16 rows)

To connect handle to other side of net bag, find opposite side, slst thru bag and 1 st from handle, continue to slip stitch across through both the bag and handle. (total 7slst). Finish off. Weave in ends.


This size will hold approximately 6lb of onions.


In the interest of our health - I DID wash dishes and washed some clothes and got them hung outside!.

Sunday, October 30, 2011

My Solar Oven

Thought maybe would want a look at my solar oven. This is a very simple one I have hobbled together, and it works, so am not going to mess with it until have everything together to make a "permanent" one :)


Simply lined an old cooler with foil, that silver thing is a stand to put smaller pots on to raise to the middle, and my dutch oven that I mostly use. The dutch oven I can just place inside (without the silver stand) and put what I want to cook inside it - even another pan or mason jars, place the lid on and I don't have to worry about burning anything! Put the window on and walk away... I LOVE cooking this way!

Saturday, October 29, 2011

No Electricity Adventure

Hello all. Had some adventures this passed week. We were unable to pay our electric bill on time (and they could not wait a day) so our electric was turned off. Not too big a deal as it was anticipated and I have 2 ltr bottles of water in the big freezer ready for just this type of occasion. Put a few in the fridge and freezer and it will hold the temp and keep things from going bad. It worked beautifully. In the morning just grabbed everything out of the fridge I would need and that reduced the time the fridge was open. No meats or anything, things like jelly and stuff was fine to keep out till evening.

I did forget to make me more tea, so I made it in my solar oven (I usually make tea on the stove) and that worked fine also… as long as I had the lid on tight, so the second attempt was perfect ;) I kept the tea in concentrated form in the mason jar and put that in a thick clay jar with water and a wet towel to cover and keep it cool. When I wanted something to drink, I just poured a bit into my glass and added water to dilute it. It also saved so much on space that I think I will do that from now on! (except in the fridge ;) )


My vegetable oil and homemade wick “candles”  and “stove” worked well also. We had plenty of light (even for me to read by, which is saying a LOT - I did have one holder with a candle) and was able to boil water for coffee on the stove. I do have a camp percolator, but it is gigantic and would have taken forever to make coffee with. So I set up my coffee maker like I usually would, boiled the water on the “stove” and poured the water into the reservoir of coffee grounds, and had perfect coffee, which I kept warm in a thermos. BTW my coffee filters I made from old sheets so no paper products…


(These are pics of the "lamp" in action along with my coffee warmer - I do not like cold coffee, and since didn't have a microwave...)

This is how I was able to boil water: plumbing strap, wire, homemade wicks, vegetable oil, a rack, and good to go.


Note the lid - not a good idea, should FIT the pot. Water and oil do not mix. The only reason this worked was because I have it hanging over the pan to drip outside the oil pan.


Laundry was fine, I have a bucket and a plunger (of which is ONLY used for clothes!) and cleaned my clothes that way. This I knew would work as have done this many times. Whats interesting is when you don’t have water, and we did that for 6 weeks in July/August, but that is another adventure to talk about later J
Drying the clothes was the usual clothesline outside.


If it weren’t for the fact that it was SO quiet, and have to work on fixing a system to heat water for showers, and solar power for computer (phones can charge off of computer so is a “twofer”), OH and for the freezer/fridge I would have been just fine without electricity. And even for the fridge, wouldn’t mind so much in winter as have made a “California Cooler” before, just doesn’t work so well with Texas heat ;) but winter time – would work just fine! The computer and phone, eh, I could do without, but it IS nice to be able to communicate with hubby now and again when he is at work, otherwise I HATE the phone and the computer is a serious distraction to getting things done ;)

So that was my adventure this week, with some thoughts to go along. Have a few ideas rumbling around in the “ol’ noggin’” and hubby is groaning that he can feel his back hurting already – before I even tell him my ideas :D


SIDE NOTE: I am NOT responsible if you try any of this for yourself! Oil WILL burn! Do not leave unattended!