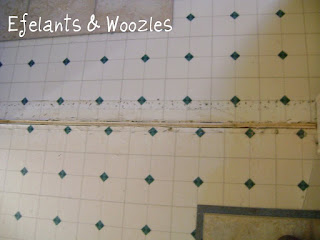
DO take the time to prep the floor:
mom's trailer is a double-wide, and she swears that whoever laid the linoleum and carpets were paid by the staple :D In some areas I bet there were 10 staples in a one inch area (no exaggeration! Do you see that speckled stuff along the seam? That is not dirt - it is from all the staples!) The staples to hold down the carpet need to be pulled out or hammered flush to the subfloor. Even though this is a "floating" floor we are putting down, if there is a bump up - it WILL show!
Also, watch for the subfloor joints... they were paid by the staple here too.
See this? It can totally ruin the floor if you leave it! Hammer them in (don't pull the subfloor joint staples out... it's not a good idea! hehe)
DON'T run your hand along the floor to feel for the staples, use the hammer's head to slide along the floor, you will feel any raised staples that way and not get splinters.
DON'T lay this type of flooring in solid rows like this:
We pulled all this floor up, CAREFULLY, and then laid it with the joints staggered. With the way it is designed, staggering the seams help lock the floor in place, and also helps you stay "square". The floor can be reused, you can re-activate the glue by using a blow dryer to heat it up, which also works when / if you need to replace a piece later (like when a dogs chews up a corner or something ;) )
DO stagger the seams!
See how it is staggered now? Works MUCH better.
Now, because this floor only has the glue strips on the edges, this poses a whole other set of "challenges". You can't cut and piece them together, well you can, it just doesn't look right, plus you lose a glued edge!
Remember these are three tiles long, so in the pic you can see on the left how far back it goes along this bump out wall.
The Dremel Tool with cutter wheel and sander is your FRIEND!
They say you can use a razor blade, score it and "snap" it.... Yeah, for a STRAIGHT cut, maybe even an "L" shaped cut. But NOT for half the length of the strip! So use a dremel tool. Makes life SOOOO much easier.
Same bump out
Here are some of the CRAZY angles we have been dealing with:
Keep in mind a couple of things. This is a trailer, I have yet to come across any that have squared, right angle, walls - but this is ridiculous! Some of these angles are not even 45 degrees! We don't have an adjustable angle either (another nifty little tool). Also, we have NEVER laid tile before, much less a "floating" floor. Son and I got a great working system going, I will do the measuring and the marking and he does the cutting, and we BOTH lay the floor.
Tomorrow I will show you how we figure out how to cut the tiles to fit... without a tape measure.


Wow, you got a LOT of work done!! Looks great! I keep eyeing my living room, wanting to rip out the carpet and put down tile, and you are giving me confidence (but also freaking me out). :)
ReplyDeleteHehe looks better than our floor Charles did ;P hehe
ReplyDelete-your daughter
P.S. you should show him this comment. ;) It'll be funny