About two months ago I was having my morning coffee and for the umpteenth time, had coffee grounds in my cup. When I am camping I will take coffee any way I can get it; but I am at home. The stupid paper filter fell over. Again.
Fine. I can beat this and make my morning coffee the tranquil event it is supposed to be. I sat down with my chewy coffee and thought about when I worked in a restaurant how the coffee was all premeasured, sandwiched between two filters. No grounds in the cups there! But I can't afford to purchase coffee like that, also I rarely make a full pot of coffee anymore (I had to cut back). So I needed something like the restaurant had but versatile and reusable, and most important, make crunch free coffee.
After several attempts I ended up with this and made 14 of them:
Here are my notes on how I did it:
This is the filters in action. I realize my coffee pot is not the cleanest and I almost stopped to clean everything, but figured "keep it real". So this is as real as it gets.
It works beautifully. Glorious tranquil, commercial worthy mornings. Especially when I remember to get the coffee pot ready the night before and set the timer.
Now I set up a weeks worth of morning goodness and coffee is a breeze now. I can even make it in the mornings! Mornings are and issue, believe me.
Do you see what the coffeemaker is sitting on? There is a method to the madness. Remember I said mornings are an issue? First it's sitting on an old rack from a long ago broken toaster oven, but was the right size to lift the coffee maker up. The baking sheet was a smaller one that came with a set, that was entirely too small for any thing I would do with it (if I'm gonna make cookies, then by golly I make a LOT). Then all that is sitting on an old towel.
This is because I can not see. When I pour water into the back reservoir I have been known to just about miss it entirely and short out my coffee maker. And that definitely ruins a morning. The whole contraption is now where if I miss, the water is caught in the tray and the coffee maker is not sitting in water. The other benefit is when I am in my wheelchair I can pull the whole thing closer to me to be able to reach to make more or get a refill. My coffee maker has lasted my attentions for about three years now, and that's a record.
Back to the filters. Once the coffee is made the used grounds get dumped into an old coffee can for composting, the filter gets a rinse in the sink with the dishes and then thrown in the laundry to be washed. I don't want to wash clothes in coffee.
So what do you think? Is this something you would try?
Showing posts with label Tutorial. Show all posts
Sunday, April 9, 2017
Saturday, April 12, 2014
Taming Embroidery Thread
| Wild Embroidery Thread |
First I need to explain that I go as cheaply as possible in organizing my (our) craft supplies. But I still want a pretty, organized, inspirational, craft room. I had looked at the stores and online to see what I could do and there were all kinds of nifty things out there, that I could not afford. So I turned to my trusty 3"x5" index cards. I am a firm believer in index cards, I have panic attacks if I am out!
3"x5" index card
I folded it in half, short end to short end.
I cut on the indicated lines.
Then folded the flaps inwards. I didn't cut them off as I felt it gave it more stability.
Wrap your embroidery thread around the center. I also added the color information and brand, etc.
I included any washing instructions on the "back" and cut a small slit at the top to secure the end.
And WOOT! I have beautifully tamed embroidery thread that I can easily see. Once all of it is finished I will organize it by color.
I will tell you about my containers in the next post!
Love to all,
EW
Wednesday, April 25, 2012
Floor Hints part 2
Now for the last hint that was invaluable to me, and of course the "ahah!" moment didn't happen until pretty much the whole house was done, but still - I WILL remember for putting in the trim! A wonderful lady over at Sew Many Ways does a write up on some nifty gadget or thingy she has found and what she uses it for - not necessarily what it was intended for! She calls it Tool Time Tuesday here is a link to one of her thingy's ;) a pull tab from a creamer carton into a pincushion ring! Way too cool - you gotta check out her blog (and her craft room!) Anyway, she reminds me all the time to think outside the box, and it must be working, cause I thought of this:
A skateboard to use as a caddy for the tools I always leave at the other end of the room!!! Now I have no problem whatsoever on getting down on the floor (I fall all the time!) getting up on the other hand is tricky business.
So this whole time we have been working on the floor I would sit down and STAY down. Son &/or daughter would do the running for more tile or to take the tile to be cut etc. etc. And son would even pull me from one end of the room to the other - whhhheeee!!!! (just take note not to do that on the sub-floor, make sure you are on the tile! ouch!)
Well, it never failed that I would forget half my tools, mainly pencils, all the way on the other side of the room, when I FINALLY thought of using my nephew's skateboard! I Kept all my tools on the skateboard, and when I was done with the cutting and fitting at the start of the wall I would roll it on down to the end of the row (not too hard as I didn't want to mark the wall) and it would be there where I needed it once done laying all the other tiles for the row! It worked great!!!
So that's it for the floor tiles I think. Next "big" project is the trim.
Now if any of you are going to be doing this, really and truly the change is amazing and SOOOO worth doing it yourself. It may seem scary and overwhelming (it was to me!) but it really wasn't that bad :D I know I complained about the unsquareness and things, (yes I know that is not a word), but I did enjoy the challenge of trying to figure those angles and curves, it was by far the biggest puzzle I have ever done :)
So let me know if you try this, and I would be happy to answer any questions on it! I am by no means an expert, but I think momma's house threw up so many different scenarios that I can safely answer a lot of questions!
And just cuz I get so few pictures of my kids together:
| My sweet helpers! |
Tuesday, April 24, 2012
Floor Hints part 1
Some hints for you if you decide to lay your own floor:
These tiles had 2 patterns on them, sometimes the glue
strips would be reversed, but still only the 2 patterns. Now because I have
OCD, I used a minimum of 3 boxes at a time, which had 8 strips of tiles, and
stacked them to match in their own piles; I did this for several reasons.
First I will try to show you the patterns:
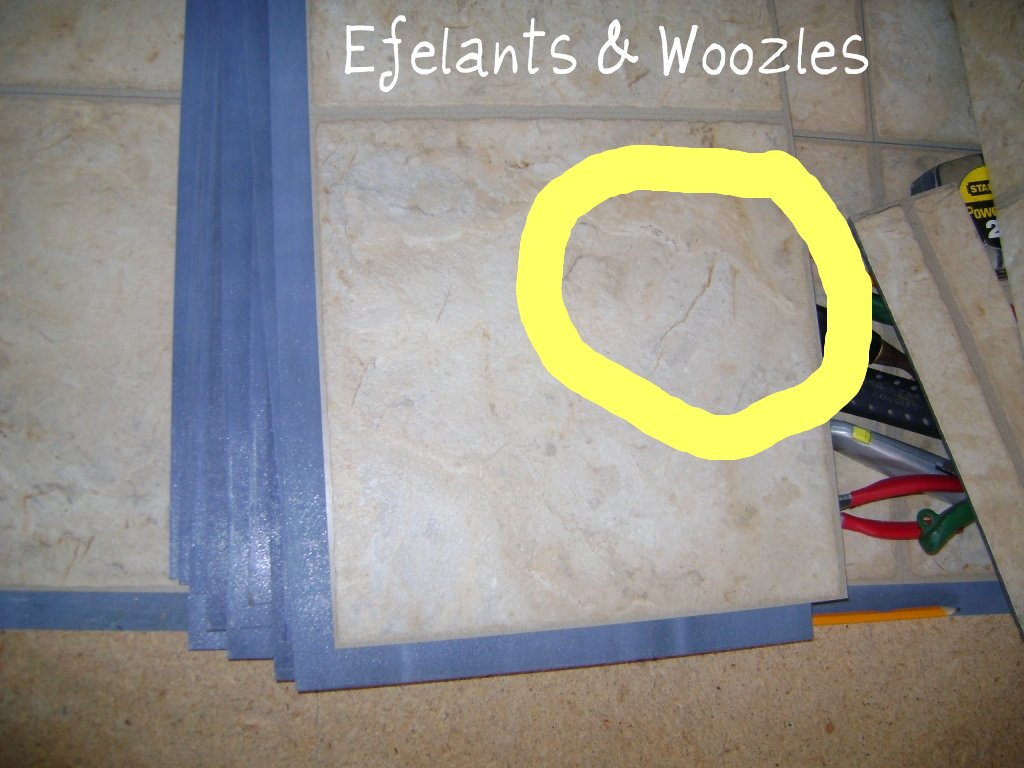
See the two marks?
Well this one doesn't have those marks, it has this distinguishing feature though. You will need to zoom in to see (at least I did ;) )
Here is what I mean saying the glue strips are reversed
It has the same exact markings but notice the glue strips? If I match the markings, then the glue strips didn't match.
So I made four stacks as to me it was easier to make sure first I had the right piece in the right direction THEN make sure the pattern wasn't going to be side by side :) This is only 3 stacks, because I had already gone through 3 1/2 boxes! So as you can see not all the boxes switch things up.
I would open at least 3 boxes so I could have a good
selection and not repeat the patterns so obviously, also staggering or
stair-stepping the joints helped to not repeat too.
| See how it is stair-stepped? |
Another reason to use
multiple boxes is because sometimes the dye lot is not exact. Kind of like when
buying yarn, you need to get it all the same dye lot or it may not match
perfectly. It’s the same for the flooring, the colors may be off by just a
hair, but if you use multiple boxes and switch them out etc., you won’t have a
darker or lighter patch of floor.
So if you stack your tiles according to pattern & the glue
strips etc., then as you’re laying the floor it can be a no brainer and you
just get one from each stack at a time. And with stair-stepping you REALLY don’t
have to worry about repeating yourself.
Starting the floor.
My uncle started laying the floor at the beginning, now I am
not bashing him, as he admitted he had never done this before either; however,
he didn’t even try to read the directions for the floor! So our starting point
was where he had left off (he had been called back to work) and we then had to
work around those issues. We DID pull up the floor just laid in the dining room
and kitchen as I showed in this post. And I keep kicking myself
for not going ahead and pulling up the floor in the den – which was basically
completed so we worked the rest of the floor off that.
The problem was he had squared up the floor using the outer
walls, when we should have used the longest inner wall. Then the wonkiness of
the walls would not have been so obvious. But mom is ok with it and is happy
with her floor… but it’s my OCD kicking in ;) So when you start laying your own
floor use the longest inner wall to lay your chalk lines to guide you (there
are all kinds of tutorials on how to do that).
One of the glaringly obvious issues that happened because of
it, is having to put a threshold where the hallway meets the kitchen. I can’t
believe I did not get a pic of it, but den leads into the dining room which
leads to the kitchen that then leads back into the den – it makes a circle…
which didn’t meet well J
hence a threshold.
Also another issue that popped up is the tile was laid long
ways, the trailer is rectangular. This
is also a double-wide, so the seams of the two halves run straight down the
middle long ways. The tiles are also rectangular and they were laid to run the
length of the trailer. It would have worked MUCH better to run them crosswise
instead. It would have laid better over the seam of the two halves of the
trailer and also would have been able to avoid using a threshold.
Enough about that, just if you should decide to do this,
please really sit down and THINK about layouts and such!
On to other hints…
DO NOT throw out your “waste” until you are DONE with the
floor!!!! When you “stair step” your seams sometimes you have to follow a wall
and cut off portions of your tile to line things up correctly.
| Starting a row and trying to line up grout lines while trying to stagger seams |
| Same row, finished and in place - note seam from previous row |
What you cut off
of one end or side of the tile may be able to be used at the other end of the
room!
| The rest of the tile from above to start a row was used to finish the row |
Or you may need just a bit of the glue strip for a very small section –
these tiles are expensive! You don’t want to waste a WHOLE piece just cuz you
need a 1 inch strip!
For example:
| This is a bit larger than one inch - but still to waste a whole piece of tile for that little bit to finish the row? Also see how there is only half the width of the tile along the wall? |
| Now just need to mark where to cut for the wire coming up and will fit right in place |
Here are our piles of “wasted” tile, you also get an idea of
why I said when you order your tiles, get about 15% more:
Mom ordered 80 boxes of the tile, kept one box
along with some of the “good” “wasted” tiles and returned 4 boxes. Each box
covers 24 sq. ft., which means 1800 sq. ft. was either used or trashed. Her
house is 2028 sq. ft. including the deck and approximately 1750 sq.ft. of living space... So we did GREAT on keeping the waste to a minimum! At $52 a box, WOOT!!!! She was going to be charged about $10,000 for installation because they charge for each angle and cut they have to make plus the square footage, and as you can see in the pictures, there were a LOT of angles to cut! Also when she returned those four boxes, she got $220 back, which paid for her new trim. Altogether, she is very happy :)
Tomorrow I will show you one hint I am really proud of…
besides figuring out to use the dremel for cutting, actually laying the floor,
mom and sister not noticing there were only 2 different tiles, measuring without
being able to see a tape measure, and not killing myself in the process!
So check in tomorrow for this new use of something TOTALLY
not intended for this purpose!
Monday, April 23, 2012
New Floor updates
The new floor. I don’t know where to start with this. I love
the floor, and even better, mom loves the floor! But I have to say, it was
tough work, and if it hadn’t been for ALL of us working together it would not
have gotten done. Son was absolutely amazing with the detail cuts and so very
patient when my “measuring” didn’t work out and he would have to recut. Also,
like I said before, the walls are NOT straight! Here is a perfect example:
See how this is straight on? This is a door jam:
Look what happens at the base…
How the door shuts and still not play peek-a-boo I don’t
know, but this gives you an idea of some of the wacky things you will comes
across should you decide to DIY your floors!
Here is a look at some of the wilder cuts we (hehe – ok,
SON) had to do:
This is a closet door jam:
We put something black under the cut so you could see what the shape is
Son figured out a technique to cut curves also with the
dremel, we did not have a router attachment and all we had was the cutting
wheel, which does NOT like to do curves! And mom did not want to pull the
toilets (after a few other mishaps with major appliances <cough, water
heater>) she was a little leery of tempting fate, so we had to cut around
the toilets. Now I would LOVE to say I know how to measure out a curve and get
it right etc, but I don’t. I did do some measuring, ie: curve starts here, the
middle is here and ends here, otherwise I drew it freehand and tried to match
as close as possible. It worked :D
Here is son’s technique for curves:
The cutting wheel - it does not do curves well and will break off. We went through several trying to cut this curve before we thought of doing this:
We had 2 Dremels, so changed out the sanding bit in one and changed it to a regular drill bit and drilled holes around the inside perimeter of the curve.
Then came around with the cutting wheel and instead of cutting like a saw, he cut it more like you would with a miter saw by just cutting down INTO the tile instead of across the tile.
Can you see how that worked? He is just going IN instead of across and with the drilled holes the width of the wheel, it helped define the curve, which was more like a LOT of straight edges gradually making the turns.
See :D beautiful work!
All thats left (besides the rest of the tile!) is to caulk and then good to go!
Because all this is going to be very pic heavy, I will post
more again tomorrow! (Really, I will, cuz I am “scheduling” it to do it! Woot!)
Friday, March 30, 2012
New Floor... Almost - Part 3
Hello Blogland, no excuses – just pure tired!
A little late, how to measure the “tiles” without a tape measure. But I would like to explain first the reason we are not using a tape measure… I can’t see the measurements well enough J! So I use a scrap piece of the tile for reference. I will show you below.
First we had to finish this row of “tiles” for under the stove, which of course had to go around the cabinets…
Lay the “tile” directly in line with where it will go along the edge, like so:
Mark the edge of the cabinet (we will call this Line A)
Now lay the piece you are trying to fit against the end of the row it will be fitted to, this will get you the length to the cabinet:
Mark your length:
Now get you something with a straight edge and place alongside the base of the cabinet and place to run across the “tile”, this will get you the angle you need to make it fit (remember these cabinets/walls are all cockeyed!)
Mark your line and then Connect your mark from Line A
I put an “X” on what we are cutting out, so the son will know which side of the line he should cut on – ie: the “trash side” because it is always easier to shave/sand an edge that is too long than it is to have a piece too short! Plus while he is cutting I am measuring for another tile… and well I will forget what was for what if he asks!!! So the “X” helps both of us ;)
“Tile” in place
Now we have this strip – the LAST pieces for the kitchen – WOOT! The problem is I can’t get a good measurement. Don’t know if you can tell, but it’s not exactly a straight line (and really and truly it is not the tile! We measured the cabinets… about a ½ inch difference!!!!) SO, this is my other “trick”…
Lay your piece you are trying to fit directly on top of the piece beside it:
Just make sure it is EXACTLY on top, I moved this aside so you could see what I was talking about!
Now get you a scrap piece of the tile and lay it against the cabinet and follow along the edge to mark what needs to be cut off:
Now have your son cut it J This stuff is EXTREMELY dusty when you use the dremel! Wear a face mask and safety glasses!
Doesn’t he do a great job?
The kitchen is done! (well for the floor anyway J)
Now hopefully I haven’t confused you or bored you to death! But really and truly it is not difficult to lay these “tiles” It is definitely intimidating, especially when it’s not your own floor! If it were my own, I wouldn’t be very picky, but this is momma’s floor.
We will also be laying quarter round moldings along the baseboards which will help hide any squiggly lines along the edges to the walls!
Subscribe to:
Posts (Atom)